
Electronic Instructions for Use
General information
This document contains information about the proper and safe use of the software and concerns the Aether Digital Platform (ADP) web application, release W-ADP 1.18.0.
- –Read this document carefully before using the software. Keep it available for reference; a paper copy is available free of charge on request.
- –The Aether Digital Platform configures the Zeus hand and the Aether MyoSense. All required functions are available within the application; there is nothing to download from a website to launch the program.
- –The application must be accessed via Google Chrome (version 131 or higher) or Microsoft Edge (version 131 or higher), on Windows 11 or higher or macOS 14 or higher, with an internet connection.
- –Bluetooth Low Energy 4.0 or higher is required to connect to the Zeus hand and the Aether MyoSense.
- –The platform lets Clinicians set up accounts, invite other medical professionals and patients, render usage data, and adjust settings and parameters of the Zeus hand and the Aether MyoSense remotely. It also allows Clinicians to connect with the patient through the patient mobile application M‑ADP.
- –You can configure the hand in two ways: the ADP Guide, which takes you through the settings step by step during a fitting session, and the ADP Configurator, which opens all the settings at once.
Intended use and contraindication
The Aether Digital Platform is intended to monitor the Zeus device (prosthetic hand, a class I device) and to remotely connect with the patient. It is designed to be used solely by Clinicians certified by Aether Biomedical; patients do not have access to this web-based software, but have access to the mobile application. The software is designed exclusively for the Zeus hand.
Key features and BLE connection
The platform lets a Clinician log in or set up an account with two-factor authentication; set up a patient profile and invite the patient to the mobile app; assign a Zeus hand and an Aether MyoSense to the patient and configure their settings; and run local, remote or asynchronous sessions to change Zeus hand and Aether MyoSense parameters. Previous settings can be restored by loading a previously saved configuration from the history logs.
The Clinician can view the patient's EMG muscle contractions in real-time graphs and adjust thresholds, and can invite a fellow medical professional via 'Invite a new Medical Professional'.
3.1 BLE connection
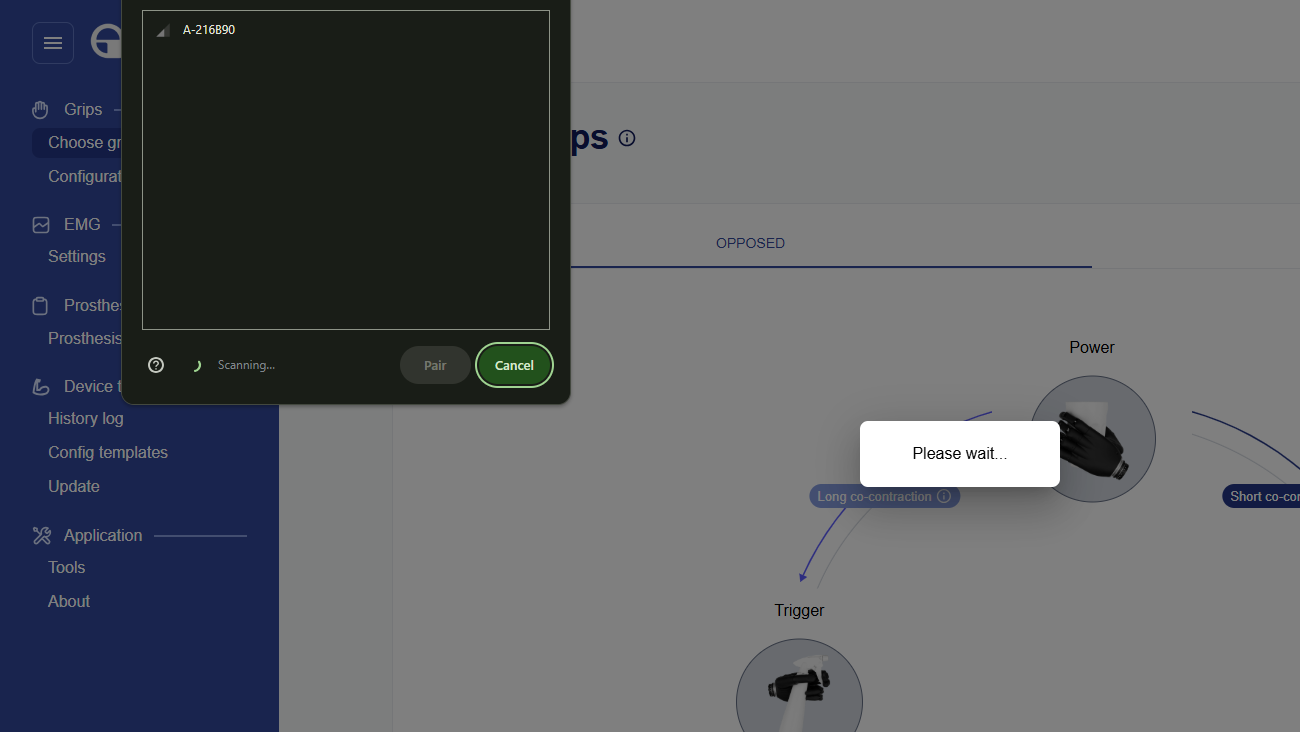
The Zeus hand uses Bluetooth Low Energy to communicate with the platform. Bluetooth on the computer must be enabled to start configuring.
The Aether MyoSense also connects to the platform over Bluetooth. Power cycle the device before you connect it; the connection can be made only within 30 minutes after it is powered up.
Accessing the ADP application
Open the Aether Digital Platform at https://zeushand.com in Google Chrome or Microsoft Edge. From the landing page the Clinician can sign in, create an account, or reset a forgotten password.
4.1 Login or set up account
- –Sign in if you already have an account. Logging in is secured with two-factor authentication: after entering your credentials you complete a second verification step.
- –To create an account, complete the registration form and set up two-factor authentication.
- –To reset your password, use the reset link on the landing page and follow the instructions sent to your email.
Landing page and dashboard
5.1 Clinician dashboard
Once the account is created the Clinician receives a confirmation email. In the Clinician Dashboard you have a list of patients, an inbox for messages, and a left sidebar for navigating the application.
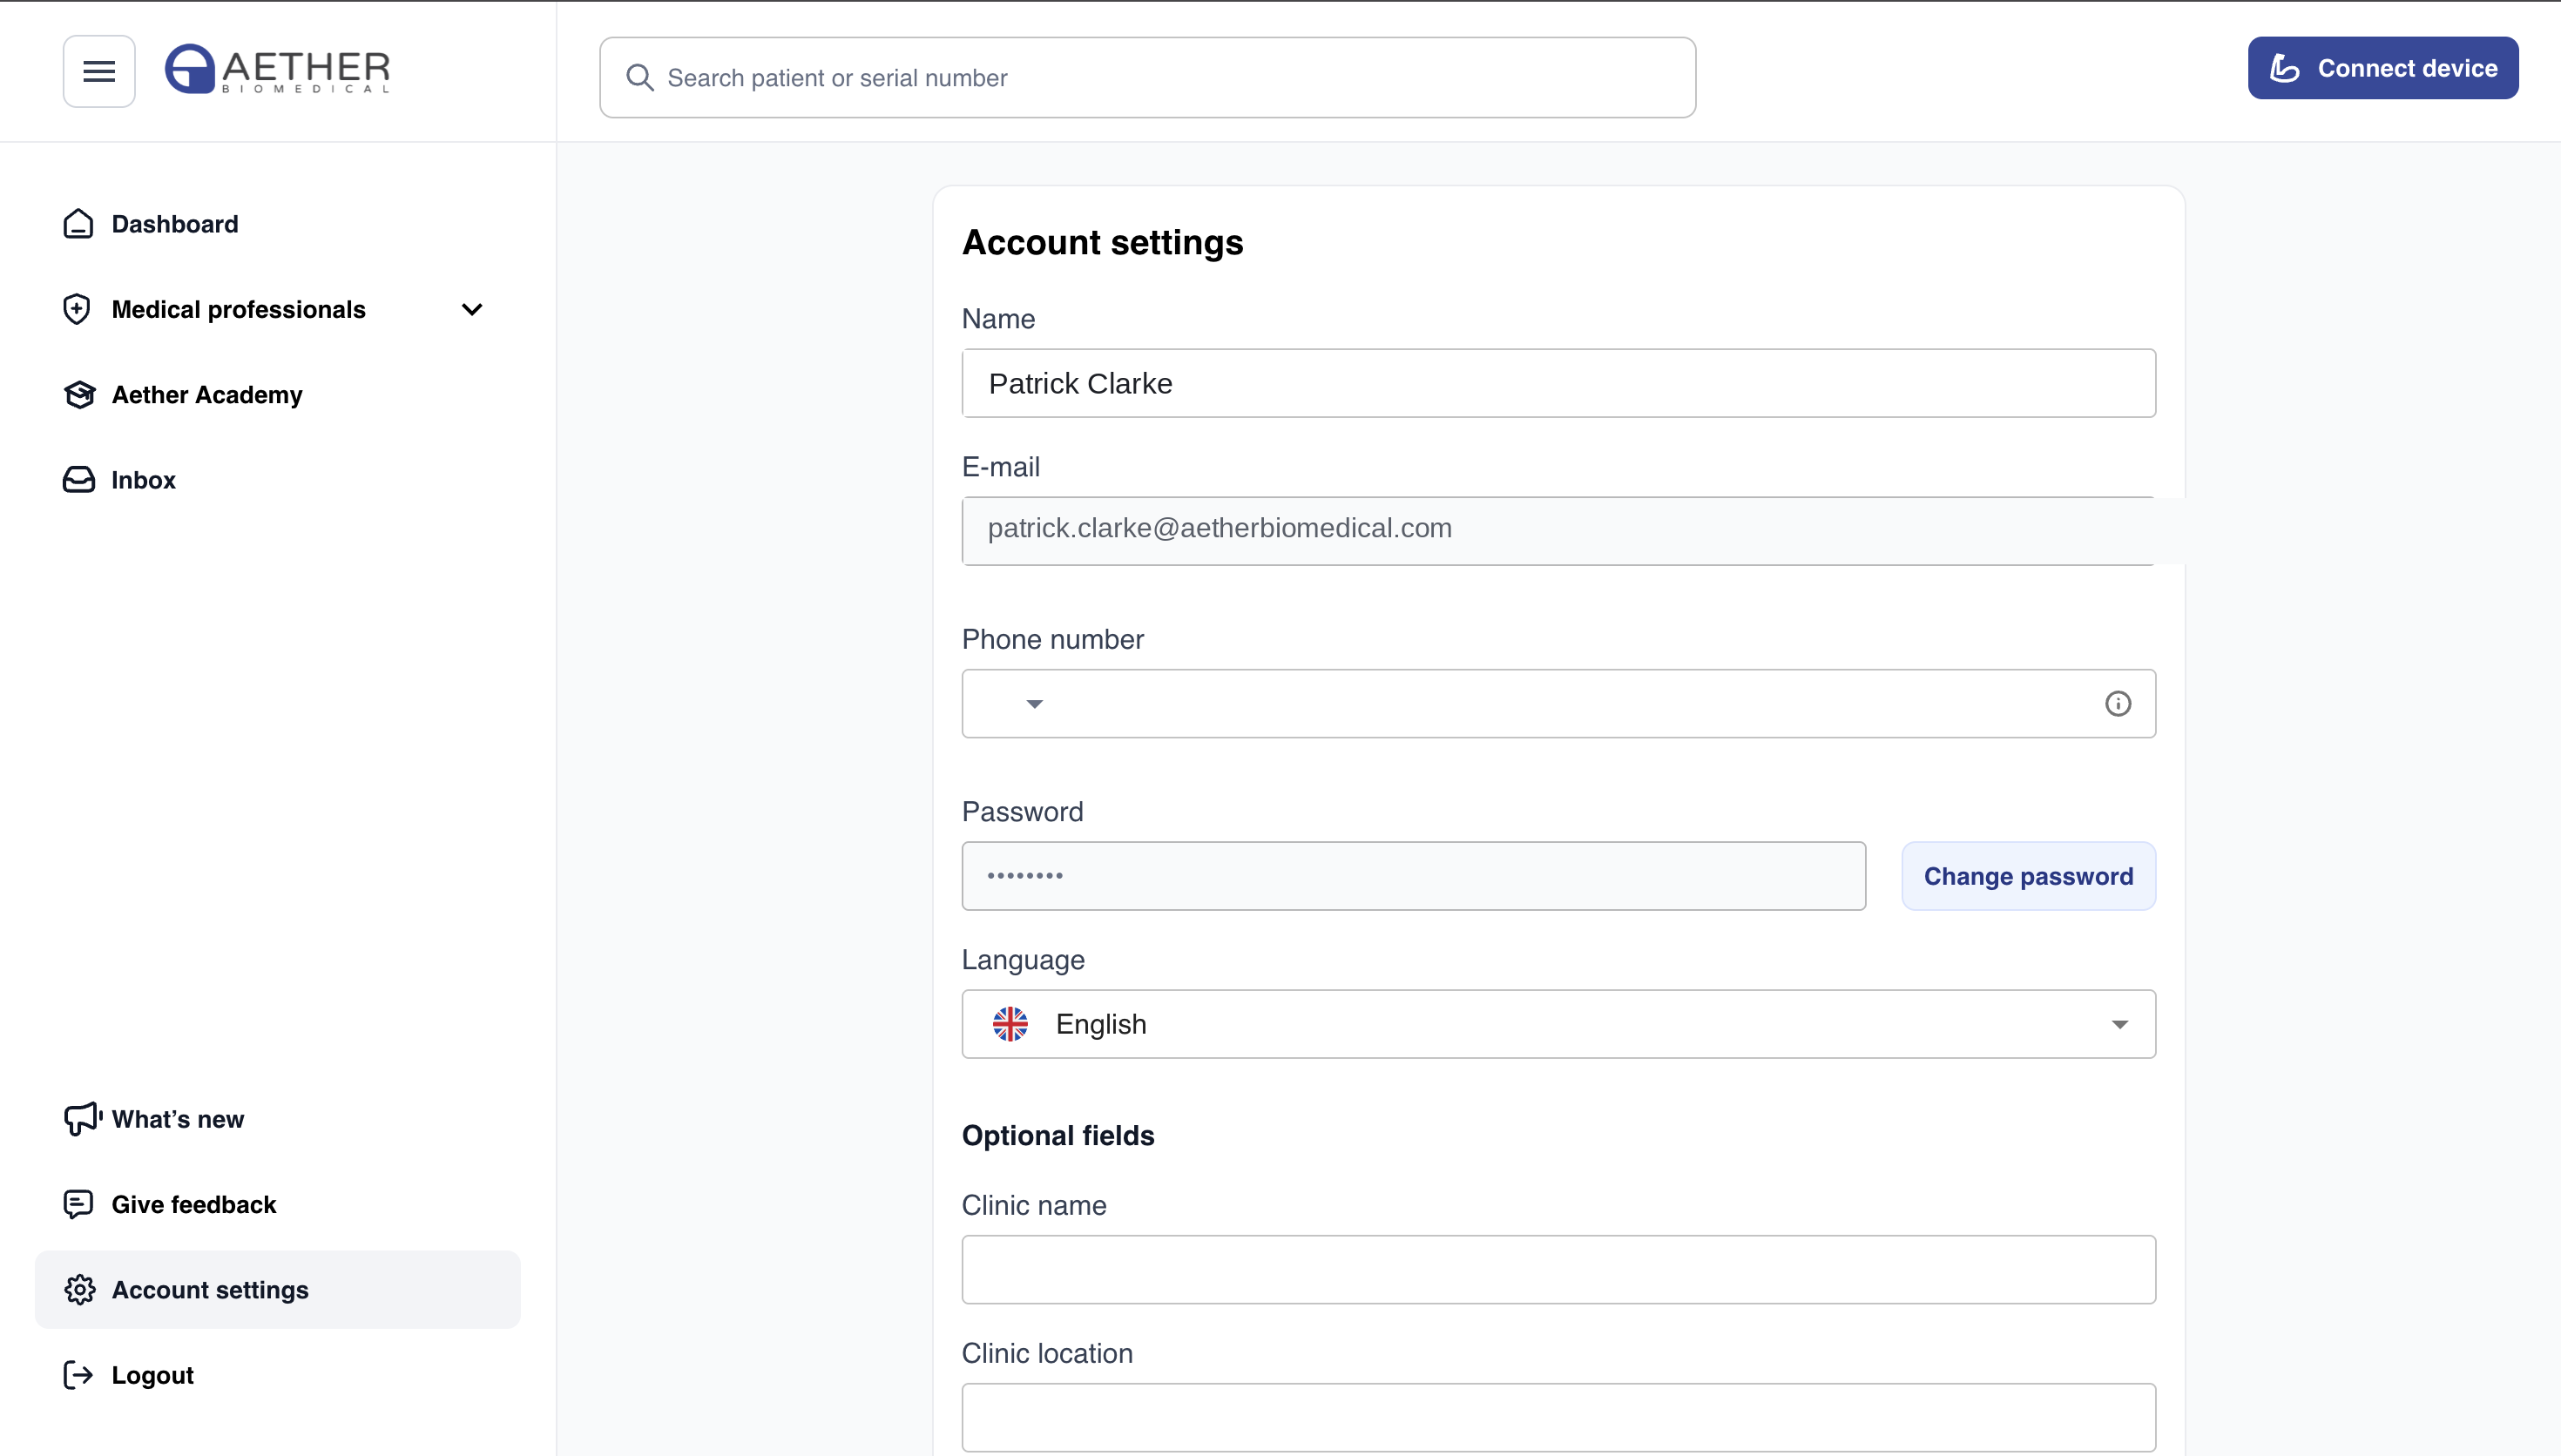
5.1.1 Account settings
From Account settings you can manage your profile and credentials.
5.2 Connect to device
To connect to a device, click the "Connect device" button in the top right corner to see all active devices nearby, or the "Configure" button next to a device name.
5.3 Patients
Create a new patient account from the Patients area and invite the patient to the mobile app. You can set goals for a patient (grips, switches and exercises) and monitor progress.
5.4 Devices
Assign a Zeus hand and an Aether MyoSense to a patient from the Devices area.
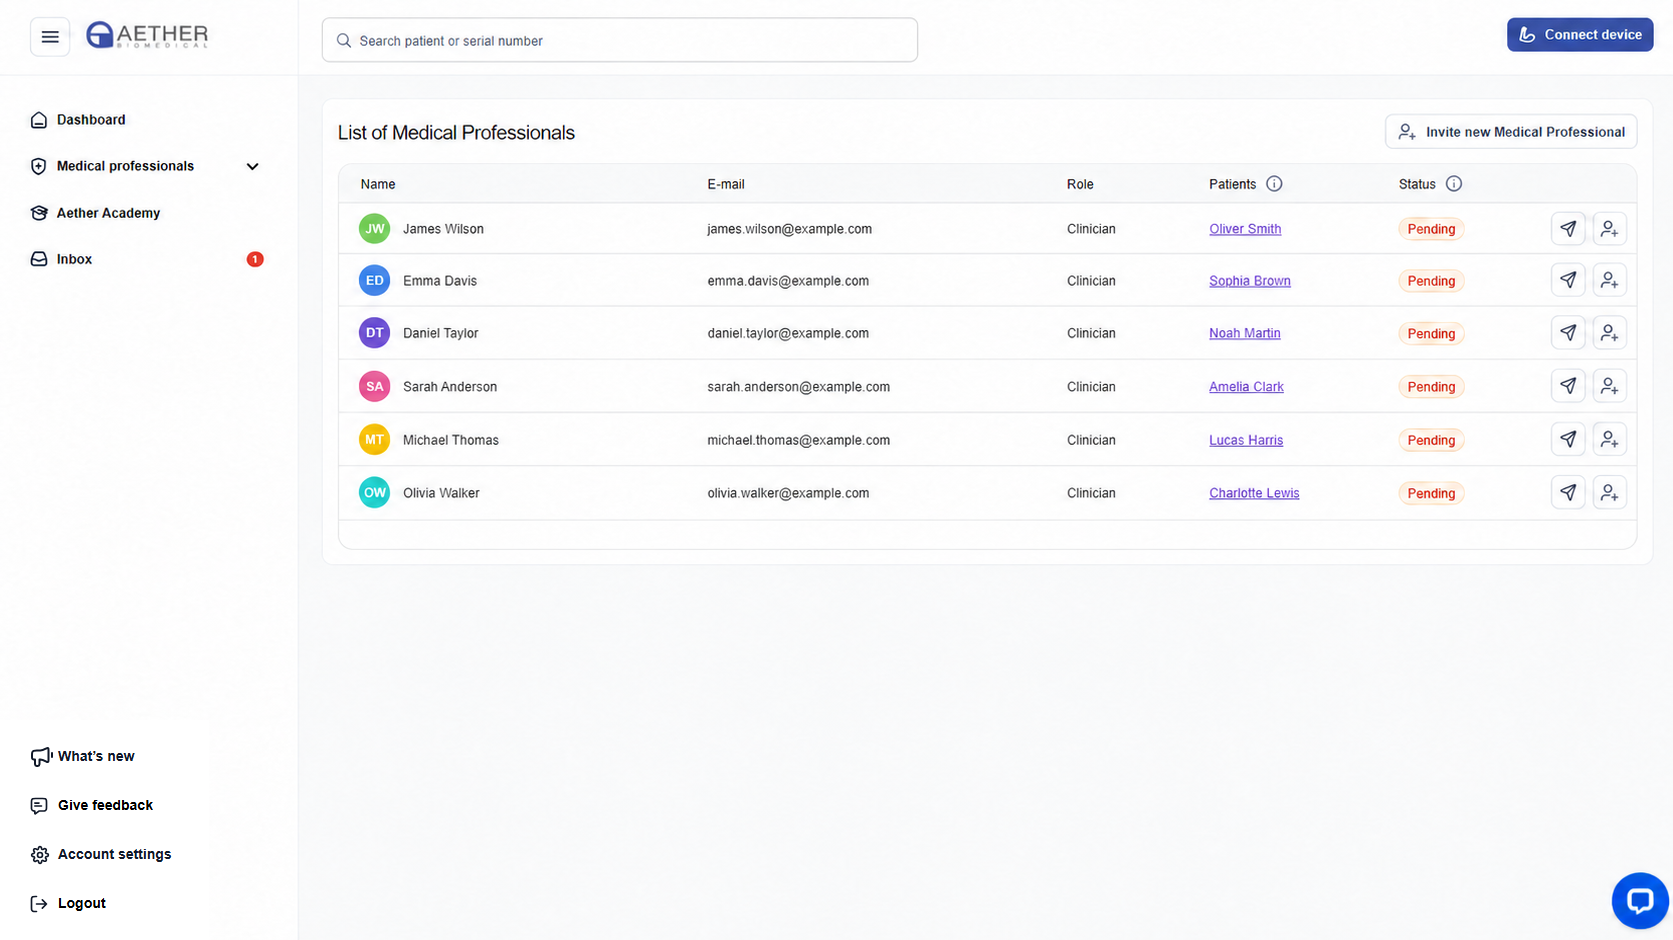
5.5 Medical professionals
View the list of medical professionals and invite a new medical professional via 'Invite new Medical Professional'.
Configuring the hand
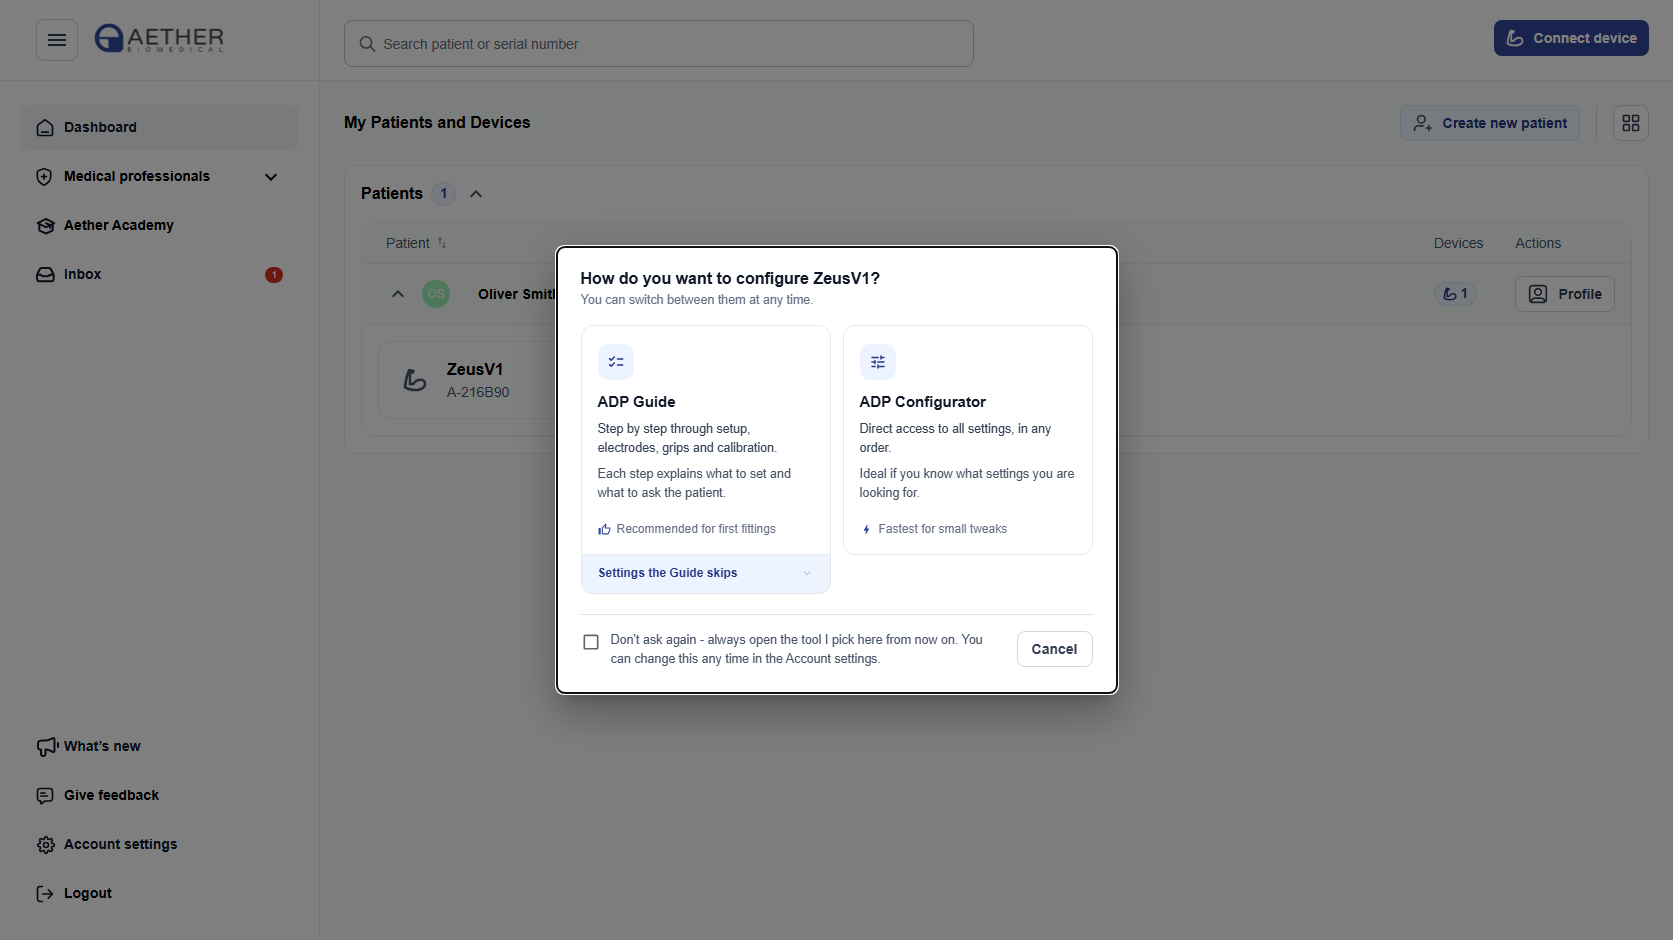
There are two ways to configure connected devices in the Aether Digital Platform. The ADP Configurator opens all the settings at once, so you can go straight to the one you need. The ADP Guide takes you through the settings one step at a time and explains what each step sets. Both can be used to change the settings on the hand, and you can switch between them at any time.
6.1 Choosing a path
When you start configuring a hand, with "Connect device" or from a patient card, you are asked which one to use. The message also lists the settings the ADP Guide does not cover, which you set in the ADP Configurator.
Select "Don't ask again" to open the same one each time. You can change this later in Account settings.
ADP Configurator
The ADP Configurator communicates with and accesses the Zeus hand through three session types:
- –Local – opened with the 'Connect device' button in the top-right of the dashboard; the Configurator can also be launched from the patient card via 'Configure Zeus'.
- –Asynchronous – opened with 'Configure' in the patient card. You prepare the changes without the patient present and send them to their mobile app. The patient opens the app and loads the configuration onto the hand themselves.
- –Remote – opened with 'Remote session' in the patient card. You invite the patient, who joins from the mobile app. Video conferencing is built in, so you can see their EMG signals live and change settings while you talk.
Allied Health access depends on the permission granted by the Clinician. You can open the ADP Configurator directly, or from the ADP Guide at any point in a session.
7.1 Changing Zeus hand settings
Within the Configurator you adjust the hand settings across dedicated tabs. Changes are sent to the hand through the active session.
7.2 EMG settings
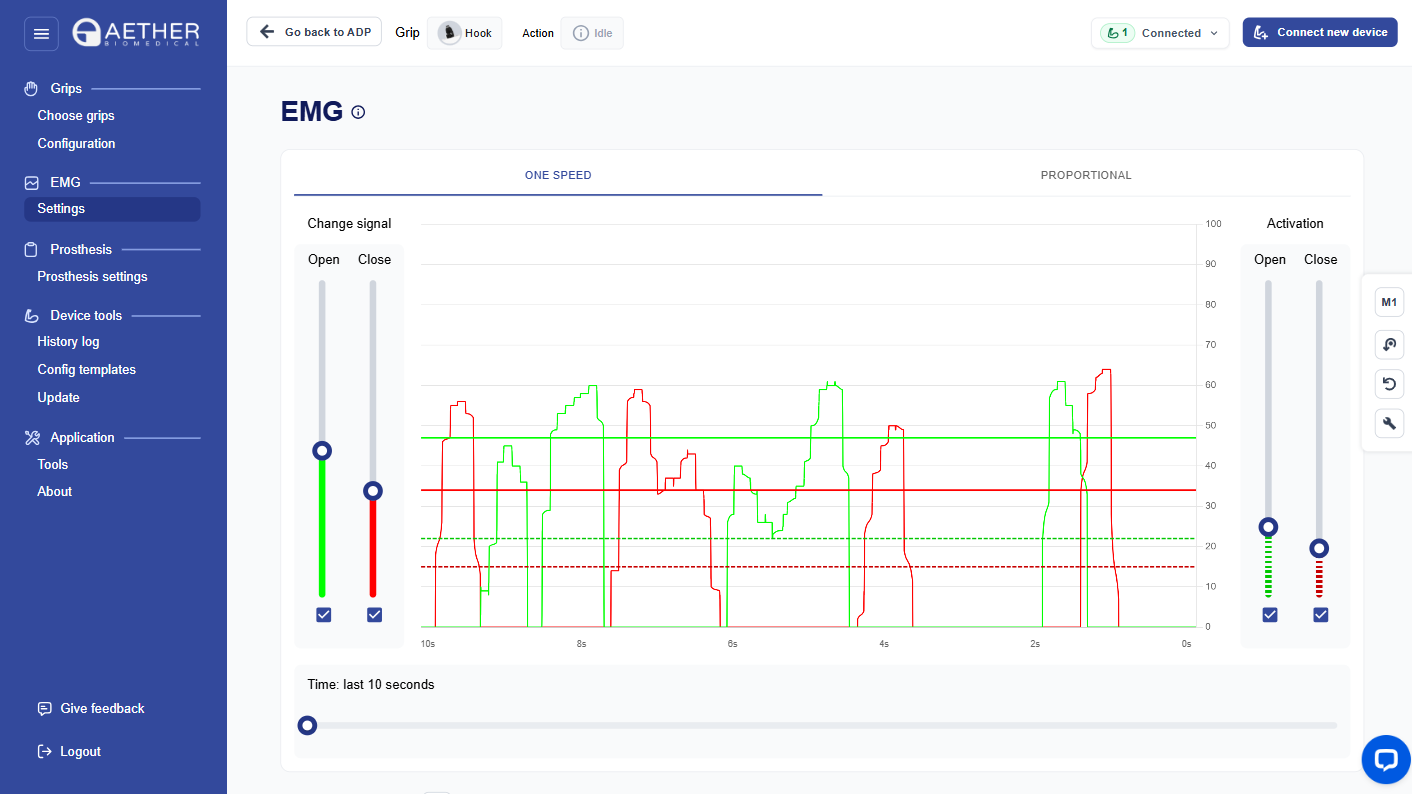
The EMG settings tab shows the patient’s muscle signals in real-time graphs and lets you set activation levels and thresholds for opening, closing and speed.
The Aether MyoSense has two settings: gain and how much the control signal is smoothed. It also gives a reading that shows how well the electrodes are making contact with the skin. The platform also shows the EMG signal as the patient contracts. The MyoSense pre-amplifies the signal before it reaches the hand, allowing a much higher gain range than Zeus.
7.3 Grips settings
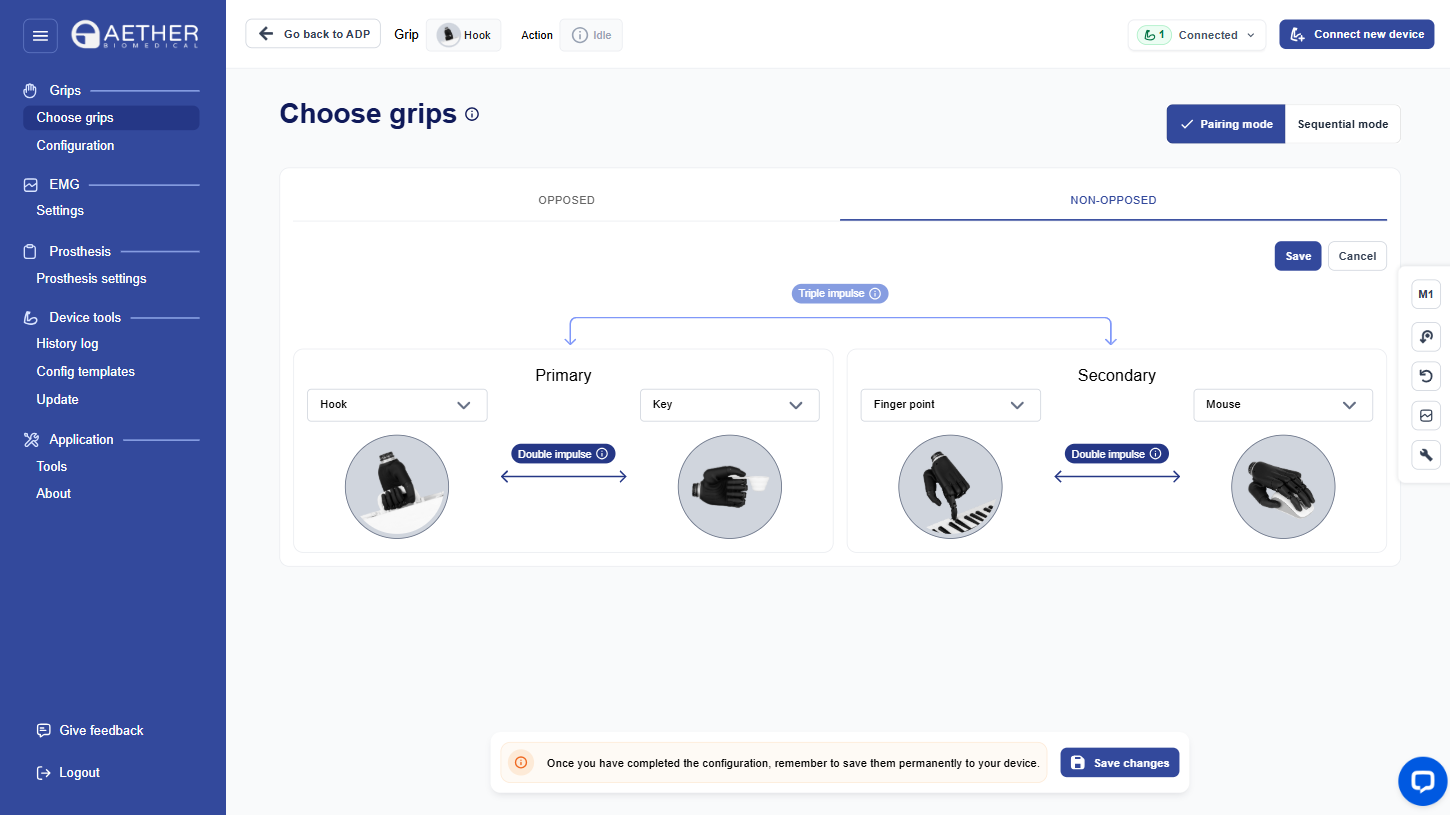
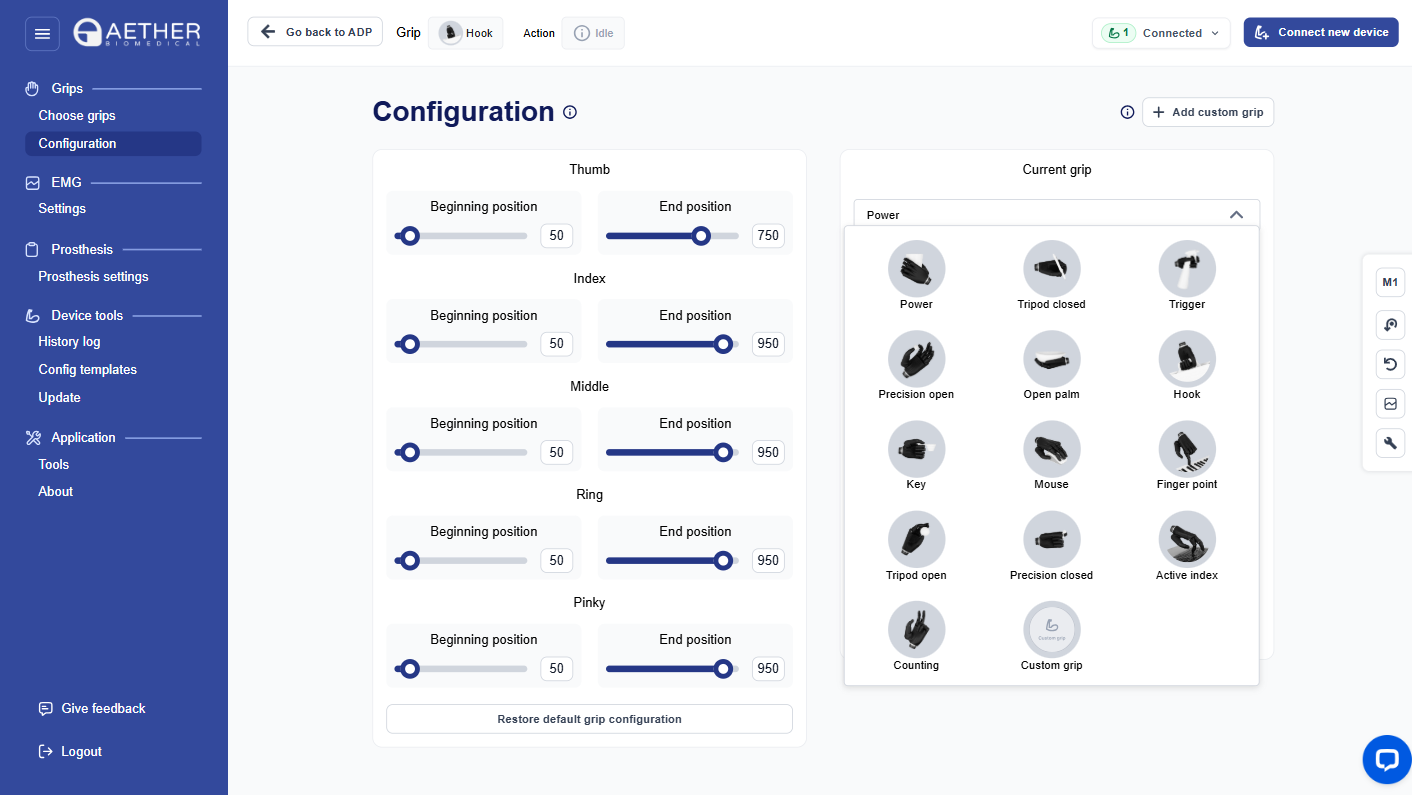
The Choose grips and Grips configuration tabs let you set which grips the patient can use and the order they appear in. You can also build custom grips by setting the start and end position of each finger.
7.4 Prosthesis settings
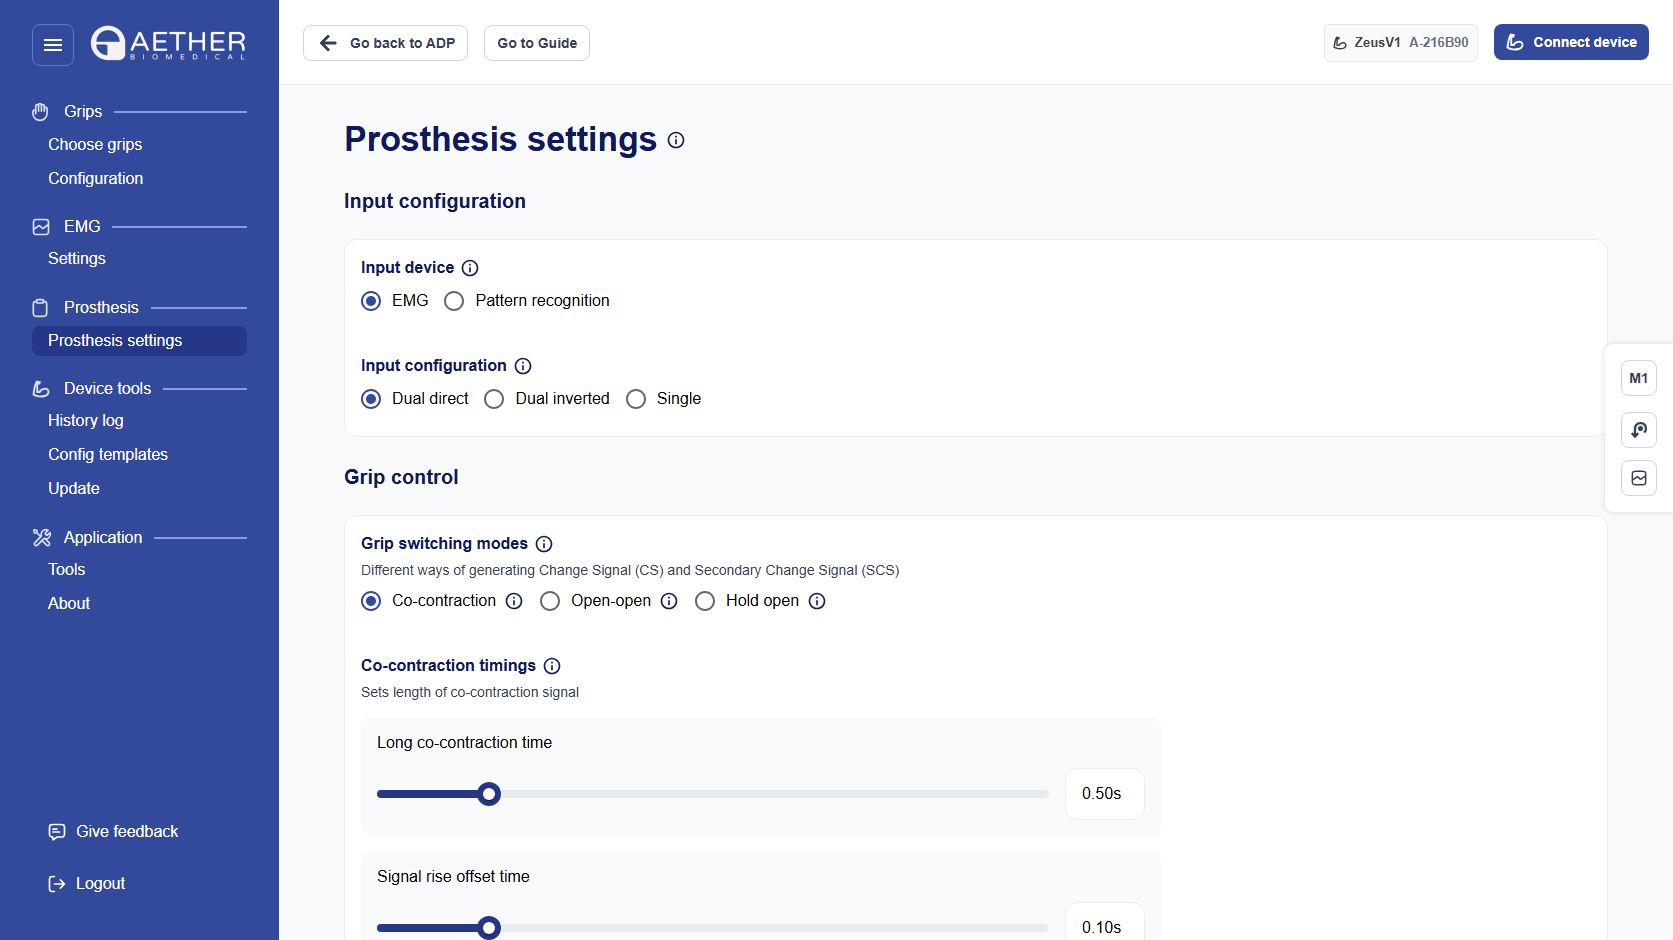
The Prosthesis settings tab covers how the hand is controlled and how it responds: input options and sites, the speed control strategy, grip switching, soft grip, finger-speed calibration, ignore EMG spikes, EMG freeze mode, and the audio and vibration signal.
ADP Guide
The ADP Guide takes you through the settings you can adjust during a fitting session with the patient. It explains what each step sets and shows the readings taken from the patient’s signals. Where a step takes a reading, the Guide calculates a value from it and presents it to you. You apply the value, or adjust it, and test it with the patient before you continue.
8.1 Starting the ADP Guide
Choose the ADP Guide when you are asked which path to use, as described in section 6.1. Before you start, check that the hand is charged and switched on.
You can go back to earlier steps at any time, and you can leave the Guide and continue in the ADP Configurator.
8.2 Steps of the ADP Guide
The Guide follows the input type and the components you select in the first step, so not every step appears in every session.
-
Device setup. Sets up the patient record and the hardware, before any settings are made. It has five sub-steps:–Patient. Select the patient account, create a new one, or continue without an account. This appears only when no account is linked to the device.–Input type. Choose how the hand is controlled: two electrodes, two electrodes inverted, one electrode, or pattern recognition. This determines which of the later steps appear.–Components. Confirm the parts in use. The hand is always included. Select the electrodes, and add a wrist rotator or an elbow where one is fitted.–Pairing. Connect the hand over Bluetooth, and the Aether MyoSense where one is used.–Calibration. The hand moves each motor through its full range, so that it knows the limits of the movement. Do not hold the hand or restrict its movement while this runs.The Guide checks the firmware in the background and tells you only if it does not match the version the platform expects.Screenshot to captureDevice setup step showing components and pairing
Figure 8.1 – Device setup step.
-
Signals. Sets how strongly the platform reads the signal from each site. It has two sub-steps:–Channel check. The patient contracts each site in turn, so that you can see that both channels give a signal. With Aether MyoSense the platform also shows how good the contact between the electrodes and the skin is. Check it before you set the gain.–Gain. The patient contracts as strongly as they can, and the Guide calculates the gain for each channel from that contraction. Apply the calculated gain or adjust it, then check the signal with the patient.Note When an Aether MyoSense is connected, it pre-amplifies the signal before it reaches the hand, allowing a much higher gain range than Zeus.Screenshot to captureSignals step, gain per channel
Figure 8.2 – Signals step, gain per channel.
-
Feedback type. Sets how the hand tells the patient that something has happened, for example that the grip has changed or the battery level is low. Choose vibration or buzzer, test it with the patient, and set how strong the vibration or how loud the buzzer is. Ask the patient whether they notice it before you continue.
-
Signal selection. Sets which signal moves the hand when the patient contracts both sites at once: either the stronger of the two, or the first one over its threshold. You also set the feedback the patient receives. This step appears only when the hand is set to first over; when it is set to stronger, the step does not appear.
-
Activation thresholds. Sets how much signal is needed before the hand moves. It has three parts:–Resting noise. Ask the patient to rest the hand on an even surface and relax it fully, so that the Guide can read the signal each site produces at rest.–Crosstalk. The patient contracts each site in turn, closing and opening the hand several times, so that the Guide can read how much of each contraction shows up on the other site.–Set activation thresholds. The Guide calculates a threshold for each site from both readings, above the resting signal and above the crosstalk. Apply the calculated thresholds or adjust them, then check with the patient that each one can be reached comfortably and held.Screenshot to captureActivation thresholds step, resting noise and crosstalk readings
Figure 8.3 – Activation thresholds, resting noise and crosstalk readings.
-
Screenshot to captureActivation thresholds step, threshold sliders
Figure 8.4 – Set activation thresholds. -
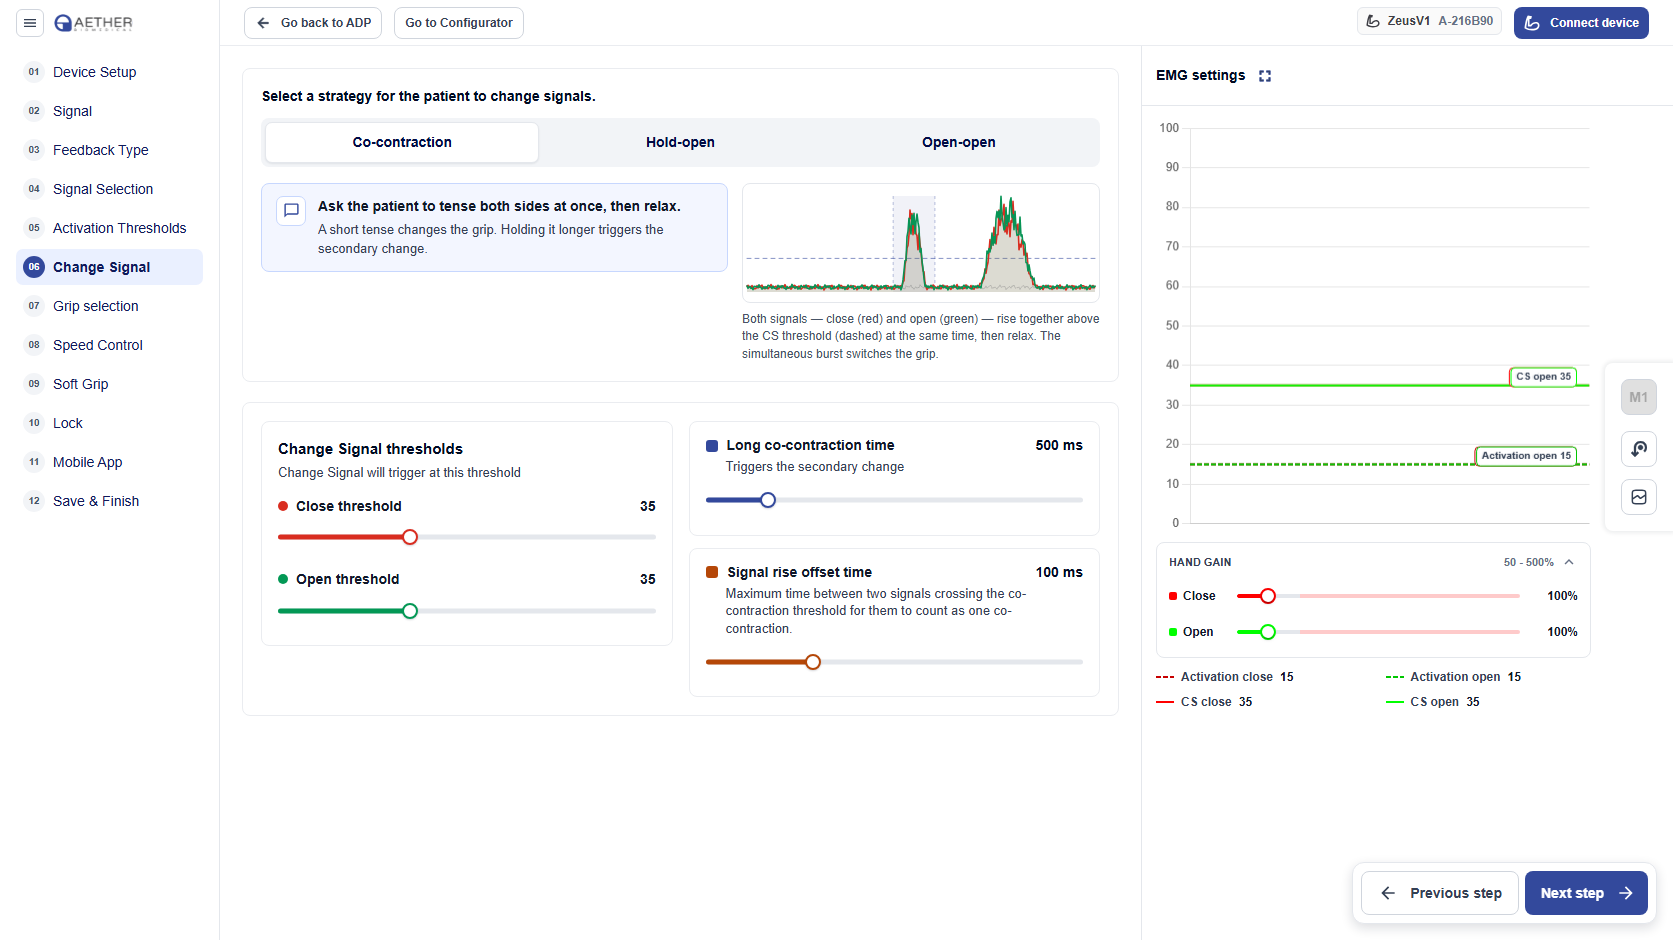
Change signal. Sets how the patient moves between grips: co-contraction, hold open, or open open. You also set the timings for the movement, so that everyday muscle activity is not read as a grip change. Check the movement with the patient before you continue. With a single electrode this step does not appear.
-
Grip selection. Sets the switching strategy, the grips the patient can use, and the order they appear in.
-
Speed control. Sets whether the hand moves at one speed, or follows how strongly the patient contracts. With proportional control you set the speed thresholds on a live graph of the patient’s signal.
-
Screenshot to captureSpeed control step, proportional control with the speed thresholds on the live signal graph
Figure 8.5 – Speed control. -
Soft grip. Sets whether the hand closes gently before it applies full strength, so that the patient can hold soft or fragile objects. When soft grip is on, you set the point at which the hand moves to full strength.
-
Lock. Sets whether the patient can lock a grip, so that the hand holds it without the patient contracting continuously. When the lock is on, you set the thresholds that lock and unlock the grip.
-
Mobile app. Introduces the M-ADP mobile application to the patient, who scans the QR code to install it and also receives an invitation by email. In the application the patient can change grips and modes, practise and follow their daily use, and check the battery and connection. The step also covers the 14-day challenge, a programme that helps the patient get into the habit of using the hand.
-
Save and finish. The Guide shows a checklist of what the patient should be able to do with the settings now on the hand, built from the settings configured in the session. Check the items with the patient. It is up to you how you work through the list, and it does not stop you saving. Then save the settings to the hand and close the session.
8.1 Steps of the ADP Guide
The Guide follows the input type and the components you select in the first step, so not every step appears in every session.
The Guide covers device setup — the patient account, the input type, the components in use, pairing and calibration — and then, one step at a time, signal gain per channel, feedback type, signal selection, activation thresholds, change signal, grip selection, speed control, soft grip and lock.
Where a step takes a reading from the patient, the Guide calculates a value from it and presents it to you: the gain for each channel from the patient's strongest contraction, and the activation thresholds from the resting signal and the crosstalk between the sites. You apply the calculated value, or adjust it, and check it with the patient before you continue.
8.3 ADP Guide with pattern recognition
With pattern recognition, selected as the input type in the first step, the signals are processed outside the platform, so the Guide shows only the steps that apply. The Guide adds a step listing what to complete in the pattern recognition application first: the electrodes and channels, the signal calibration and gain, and the grips enabled on the hand. The steps that rely on signals read by the platform are not shown, the patient does not change grips in the mobile application, and the functional checklist does not include grip switching.
8.4 Saving settings to the hand
All the settings you make in the Guide are saved on the hand. While you work, they are held in the hand’s temporary memory. They stay on the hand only when you save them at the Save and finish step, and you confirm each time settings are sent to the hand.
Device Usage Monitoring (DUM)
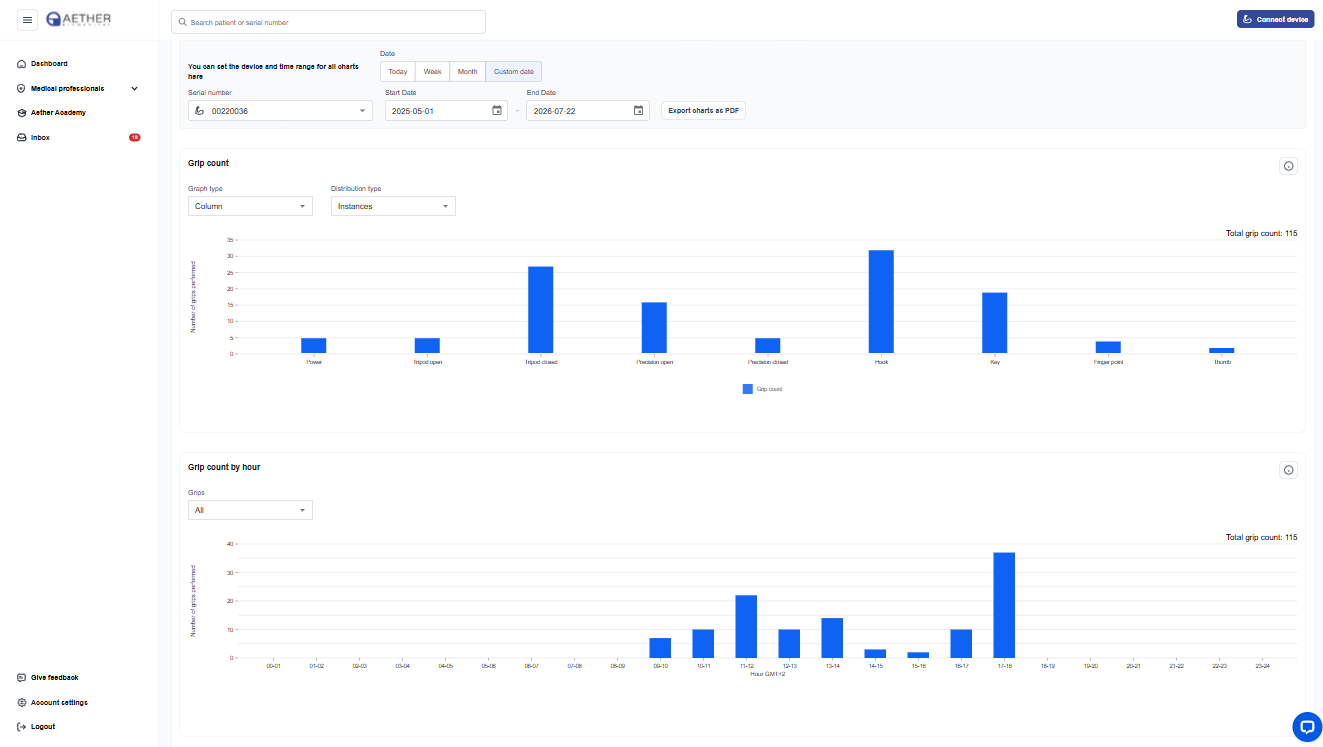
Device Usage Monitoring provides information on the patient’s day-to-day use of the prosthesis. It consists of graphs showing the number of grips and grip switches performed, with an hourly breakdown.
Modes
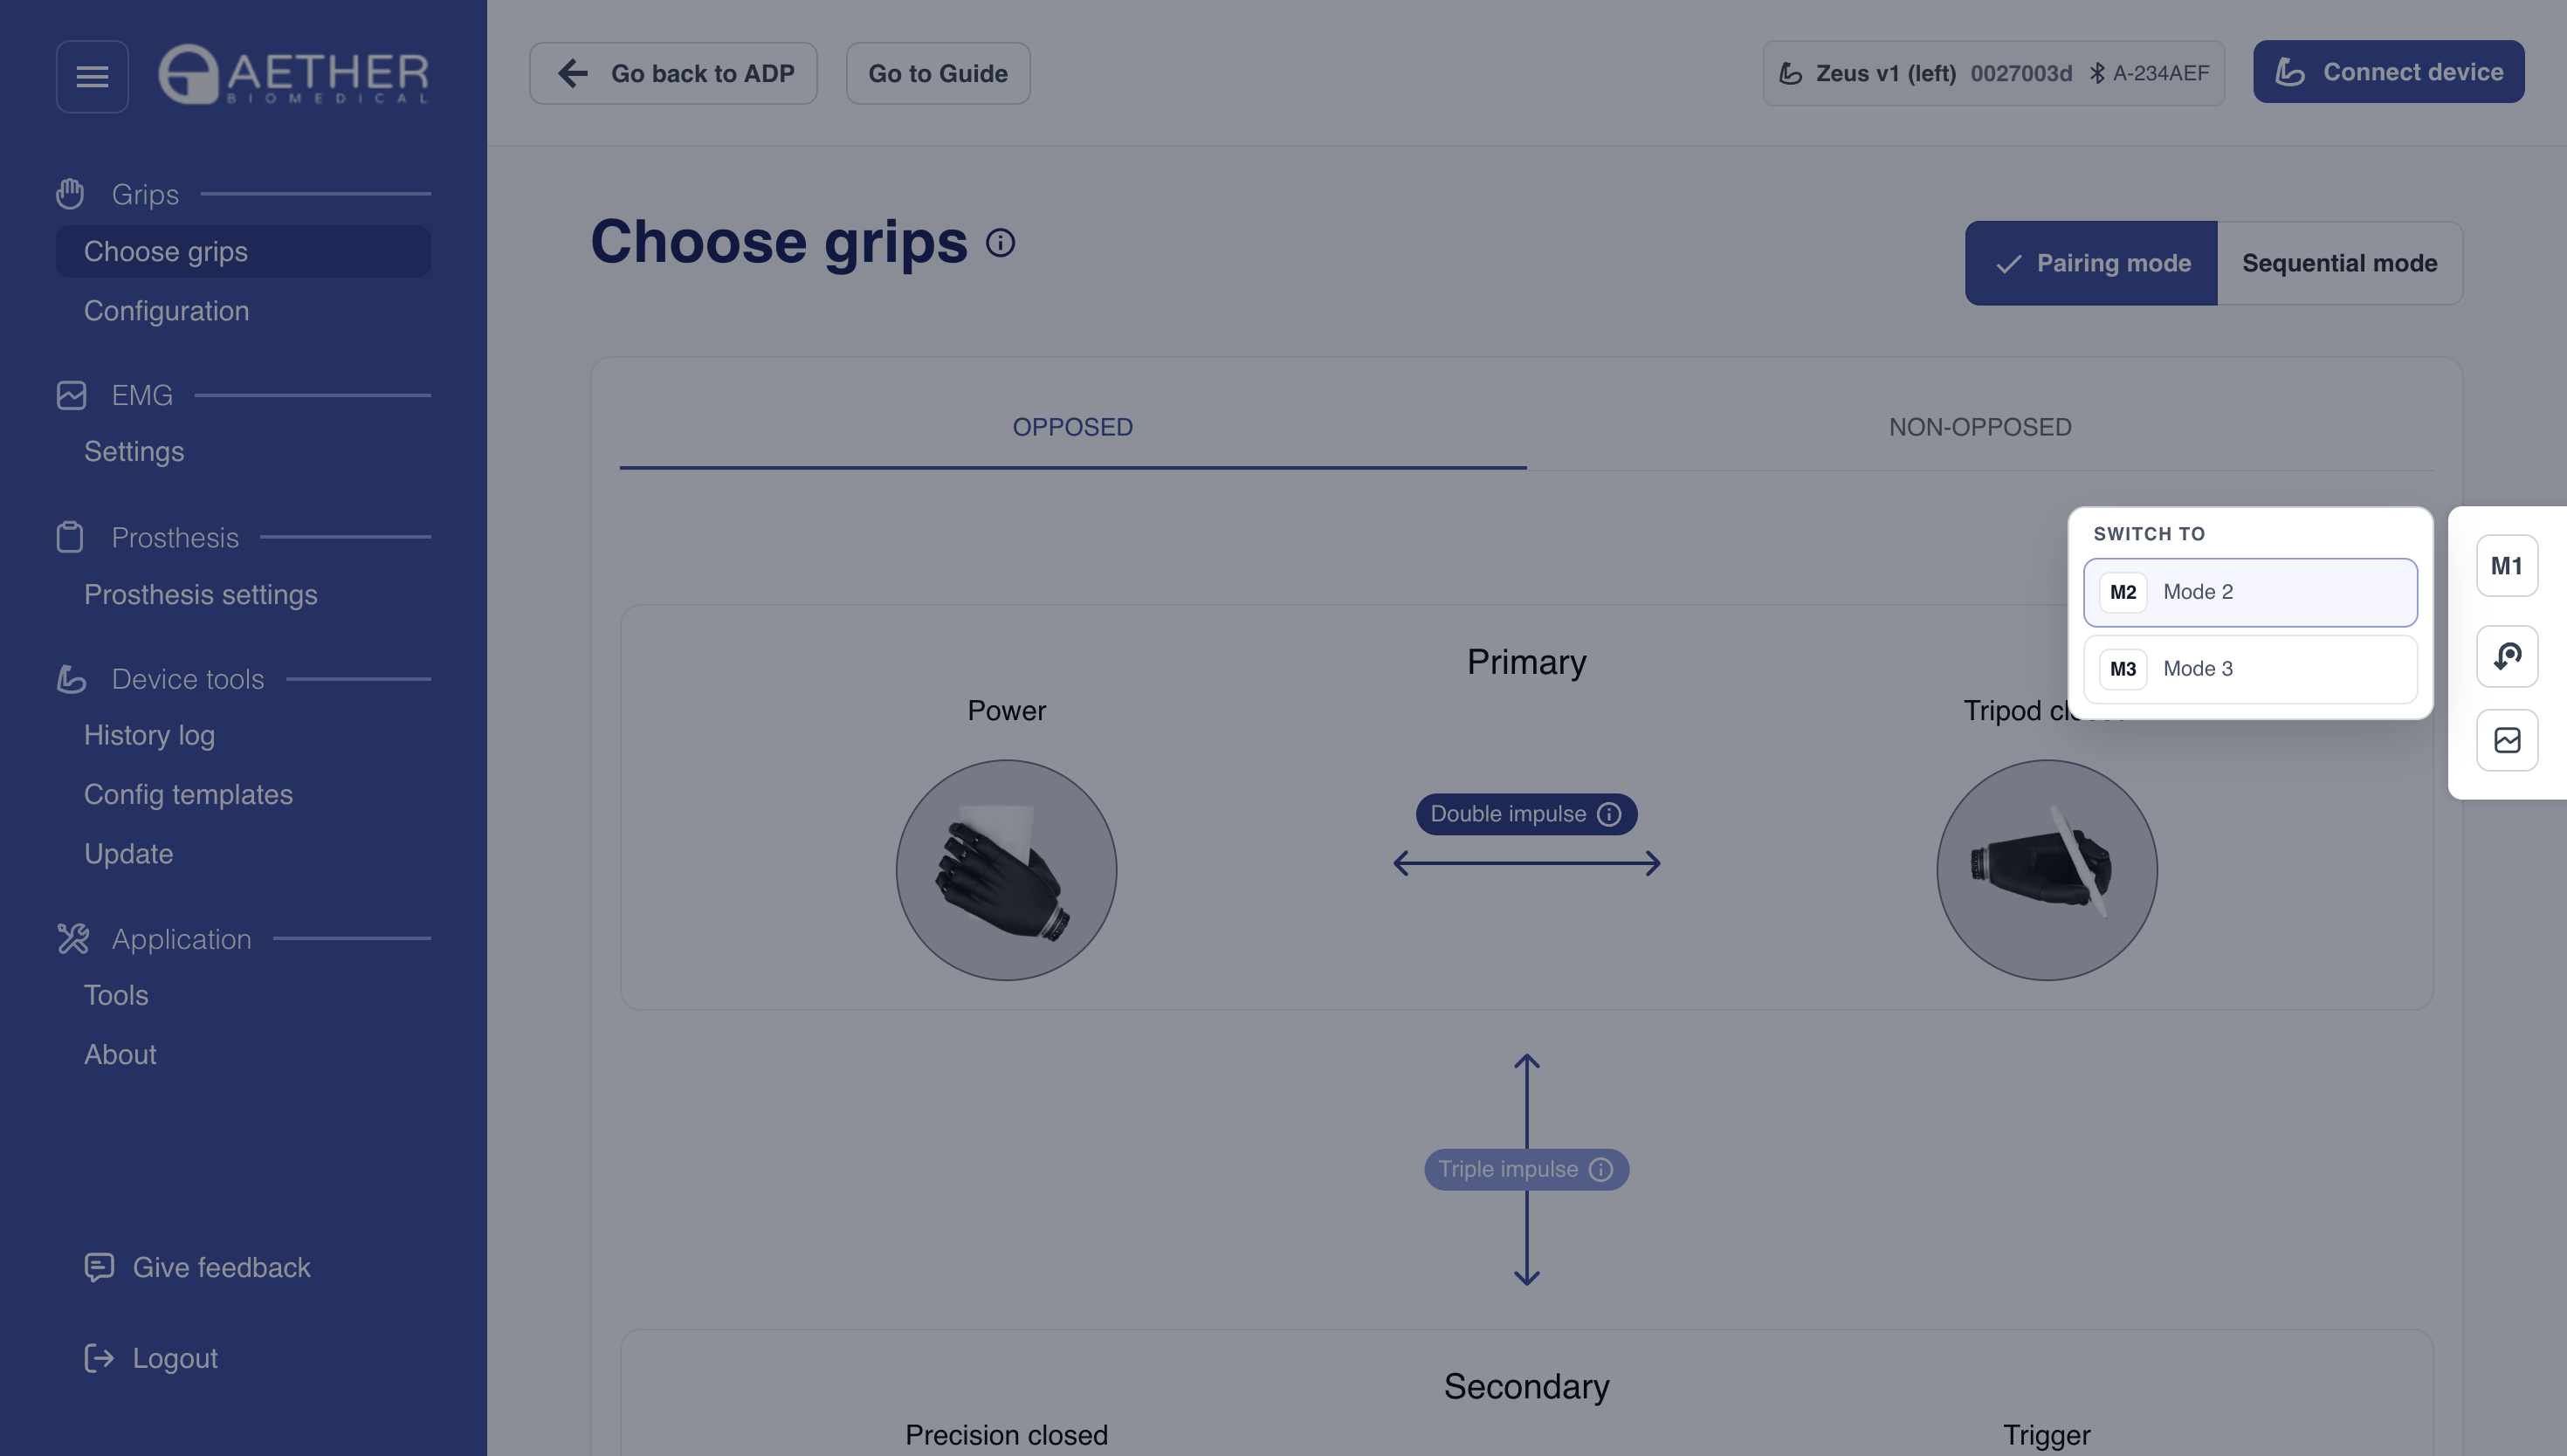
Modes are different configurations saved in the device, for example for sports or recreation. After the Clinician creates mode profiles they are sent to the patient's hand, and the patient switches between them in the mobile app. Each mode's settings are separate, with a maximum of three modes per device. Choose the mode you are editing from the panel on the right in the ADP Configurator. Modes are not available in the ADP Guide.
Allied Health
Allied Health users can use the same functionalities as Clinicians once access is granted, covering remote, local and asynchronous sessions, config templates, modes, goals and history log. Access to selected patients and functionality depends on the permission granted by the Clinician.
Technical support
For support, email support@aetherbiomedical.com. Describe the question or problem, ideally what led to it, what is happening and your desired outcome; screenshots can be attached.
12.1 Troubleshooting
Device / ADP firmware version mismatch
Occurs when the device firmware differs from the version the ADP expects, which can mean the device was updated outside the ADP. This is also reported when you open the ADP Guide. Update the firmware before you continue.
Configuration not found
Shown when the device has not yet been connected to the web or mobile application. Until configuration is initiated, session and asynchronous configuration modes stay disabled.
Upgrade needed
Follow the on-screen prompt to upgrade.
Firmware update
The Clinician can update the firmware on the patient's Zeus hand via the ADP. Go to the patient profile, start a Remote or Local session, then open the Firmware update tab in the ADP Configurator and follow the on-screen steps. The hand has to be calibrated again after a firmware update. The ADP Guide runs the calibration in the device setup step.
Calibration did not complete
The motor calibration was interrupted or did not finish. Make sure the hand can move freely and is not being held, then run the calibration again from the device setup step. Contact support if it does not complete.
Device disconnected unexpectedly
The Bluetooth connection to the hand or the electrodes has dropped. Reconnect and continue.
Cannot connect to the Aether MyoSense
Check that the battery is charged and the device is powered. Power cycle it to wake the Bluetooth. Both three-pin connectors have to be connected for the device to be powered.
Weak, saturated or no signal
Check the skin contact quality in the platform and that the electrodes are properly fixed in the socket. Check the gain. For electrode placement, see the Aether MyoSense IFU.
WiFi
iOS may turn WiFi off to save battery, which can delay or drop notifications. Check the WiFi connection and turn it off and on again.
Compatibility
The Aether Digital Platform supports Zeus V1 and Zeus V2 hands, and the Aether MyoSense. Compatible models:
Reporting
Any serious incident that has occurred in relation to the device should be reported to Aether Biomedical Sp. z o.o. via complaints@aetherbiomedical.com and to the competent regulatory authority of the country in which the user is resident.
Security
Operate the application from a secure device with a firewall enabled and anti-malware software installed. Check the certificate of the web page before logging in. Close the application when you are not using it or are away from the computer.
Other information
- –Aether Biomedical declares that it meets the appropriate European standards for the design, manufacture and supply of prosthetic products and user software under the CE mark. Continued compliance is monitored by internal and external audits.
- –All individual products are marked to indicate compliance with Medical Device Regulation 2017/745.

